This “how to pair” article provides easy-to-follow practical instructions for pairing our Zigbee products between the hub, transformers/receivers and controllers. Other parts for lighting control and lighting except the hub are available from us. So far we have had good experiences with Philips HUE, Samsung Smart Things and Lidl Silver Crest hubs. Zigbee is an open protocol, so virtually all software that works with Zigbee 3.0 or earlier will also accept LedStore’s lighting control products.
We have included instructions in the Product Attachments section of the online shop for each product, but this article will clarify the steps in the process and give you the simplest ways to make pairings and overcome common challenges.
1. Hubi lays the foundations for programmable mobile control
Hubi is the heart of smart home control. All devices supported by that brand can be connected to the Hub, as well as other so-called. third party devices, unless specifically blocked by the Software. Hub has several names, so if you see the following terms, they are all the same: bridge, gateway, connector.
The hub needs to be paired with a router/modem to which it connects via the ethernet cable that comes with the hub. However, the hub itself does not use the home wifi network, but a more powerful mesh network than wifi is created between the Zigbee devices. So, first of all, you need to deploy a hub and an app on at least one mobile device.
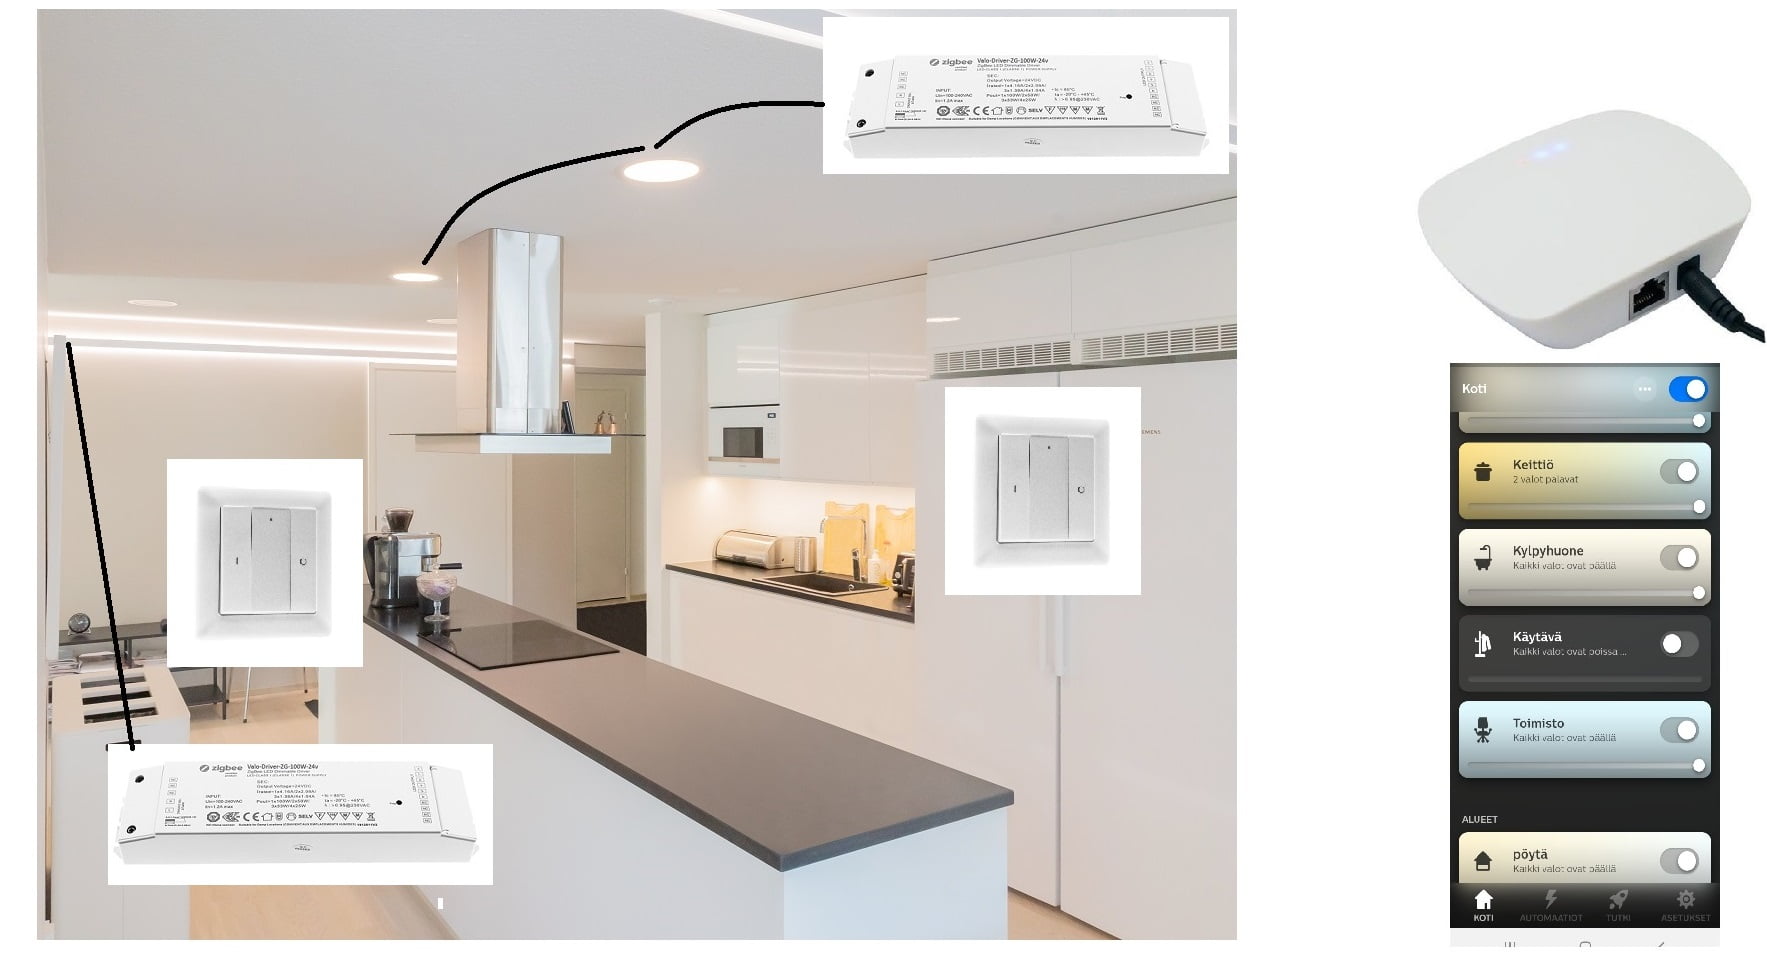
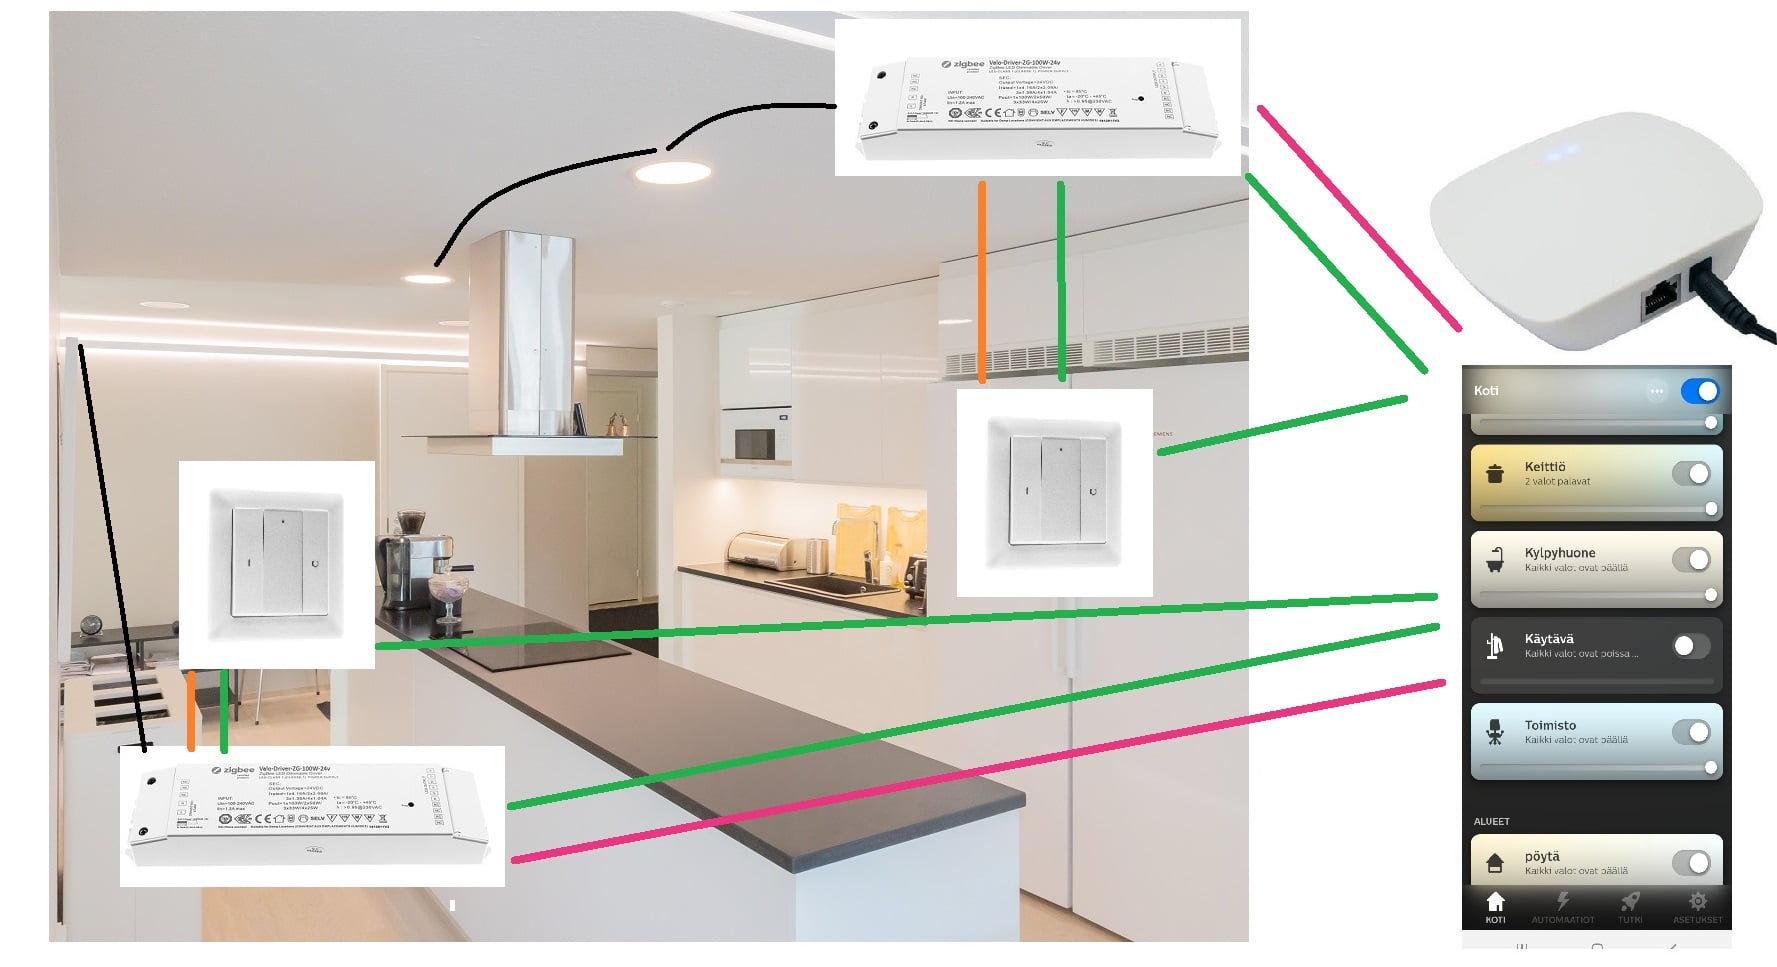
Zigbee control can be created for luminaires in three ways
In the example below, the ceiling pendants are controlled as one group and the LED strip light on the wall is controlled as one group. The black lines represent the power line. Zigbee control can be implemented in alternative ways, in the figure below the lines represent the wireless pairs that are opened between devices.
a) used for the hub with the same brand mobile app to control lighting(pink connectors)
b) are taken
wireless control buttons
including
for mobile use
(green connectors)
c) If programming and mobile control of the luminaires is not desired, the alternative is to use wireless controllers without a hub (orange connectors). In this case, the hub can be deployed at a later stage.
PAIRING IS DONE LIKE THIS:
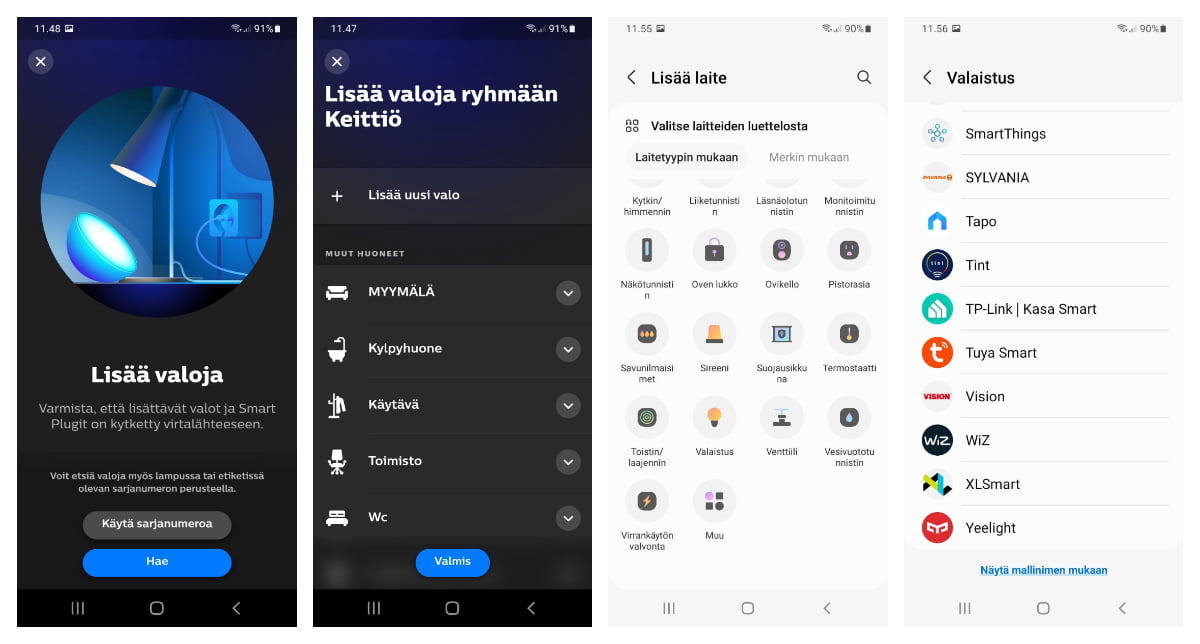
The Hub interface makes it simple to connect light. For example. In the Philips HUE app, in the Home menu, select More lights -> Search. The software searches for a device in pairing mode and displays it on the screen. This allows you to name it and add it to the room or group you want.
As another example, in the Samsung Smart Things interface, select Add Device and choose Lighting from the list of devices, and Tint from the lighting list. Below is a picture of both interfaces from the add light/add device view.
Also, LedStore’s VaLO Zigbee wireless controllers/buttons are connected as lights/lamps , but they are not connected to any room and do not appear as devices in the UI. This is where the installation often goes wrong because even if the button is added as a light, HUE, etc. will not find it, BUT the button’s indicator light will tell you that it is connected to the Zigbee network. This is important, otherwise after pairing the button directly to the transformer it will be removed from the app if the button is not first connected to the Zigbee network. The exception is the push-button programmable Friends of Hue controller, which is added as an accessory and can be found as Friends of Hue. The user interface defines the button functions as desired.
2. Lighting control and lighting components
Zigbee controllers can be added to the hub, which are either transformers with receivers built in or receivers that are separate from the transformer. When you buy lights, the drivers transformers for the luminaires are defined according to the total output power and voltage of the operating groups.
All these drivers are individually retrieved from the hub and added to the desired room and named according to the lighting group. For example, living room ceiling lights, living room curtain lights, living room floor lamp. When a lighting device appears in the software, the software recognises its lighting control features. Features include dimming, white light colour temperature control (CCT) and colour changing (RGB).
Depending on the hub, you can connect about 50-200 devices (receivers) to the smart controller, so this number is sufficient for a fairly large apartment complex, unless you take a separate receiver for each spot. Ns. smart bulbs such as E27 and GU10 always contain a receiver per light, so these take up the most space in relation to the amount of light available. Almost all LedStore luminaires can be connected not only to other home automation systems, but also to Zigbee smart controls.
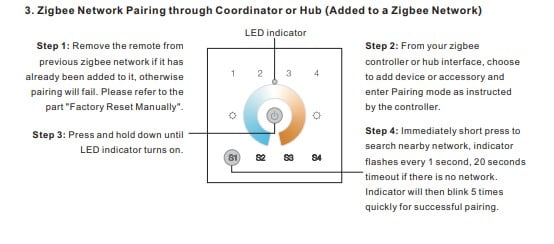
3. Transformers, i.e. power supplies and receivers
PAIRING IS DONE LIKE THIS:
Let’s start with the hub interface by adding lights. Zigbee transformers have a receiver built-in (e.g. Zigbee RF 24V 200W CCT) and are paired with the hub by pressing the transformer program key five (5) times. The lights and power must be on when the pairing is started, so that the transformer is energized and the flashing lights indicate that the pairing mode has been activated.
Receivers that are disconnected from the transformer are paired to the hub in the same way as drivers, i.e. by pressing the program key five (5) times. This will also act as a reset, and the device will then immediately enter pairing mode.
Once the driver is connected to the hub (remember to name it), the lights wired to it can be operated via an interface from one or more mobile devices connected to the hub. (method of use
a
)
In addition to this, LedStore’s VaLO Zigbee wireless controllers can also be included in addition to mobile use (use case
b
). Connection instructions Touch Link method for wireless and Find&Bind method for network-powered controllers in the next section.
If mobile control, i.e. a hub, is not deployed in addition to wireless controllers (mode of operation
c
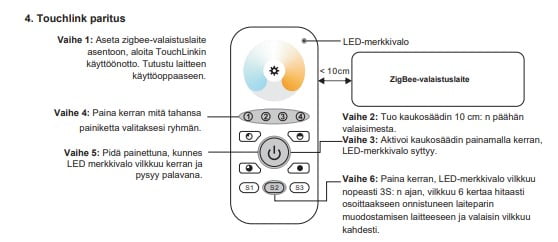
), the pairing is done directly between the transformers/receivers and the controllers. One driver and one controller make a pair, not multiple controllers on the same transformer (but multiple driver on the same button will work). The transformer’s paired mode is then activated by pressing the program key four (4) times. This is the Touch Link pairing method, where the controller is brought less than 10 cm from the transformer/receiver for the pairing, and depending on the type of controller, a connection is established using the Touch Link method, instructions below for wireless wall-mounted and wireless remote controllers.
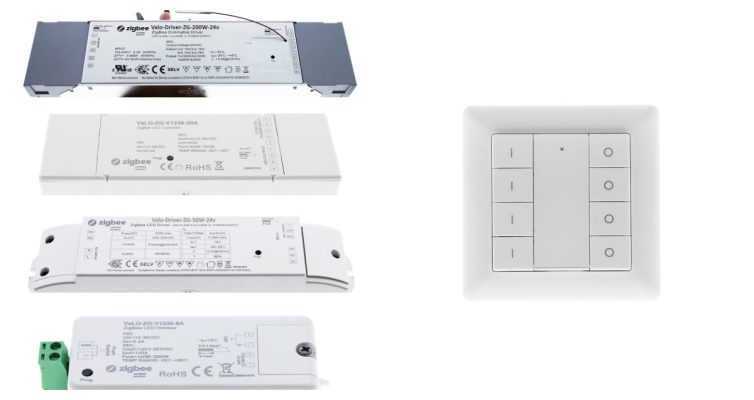
Below are examples of transformers and receivers, as well as a four-piece controller for four groups of luminaires.
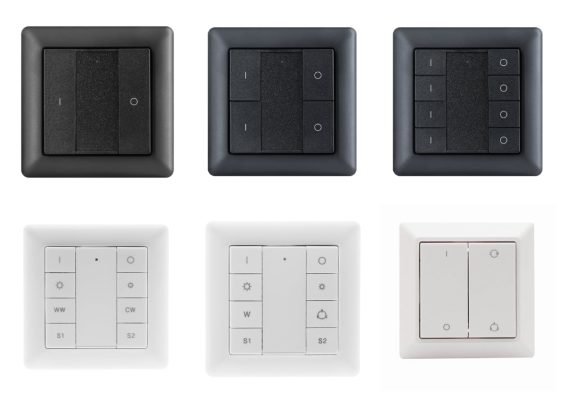
4. Wireless, battery-powered, wall-mounted controllers
PAIRING IS DONE LIKE THIS:
How to use
b
, mobile use + wireless controllers. Wireless controllers are inserted into the hub, then connected to the desired transformer/receiver according to the Touch Link instructions. The key is to follow the green indicator light on the button, which flashes during the pairing process, when connecting to the hub. The pairing ends with five rapid indicator light flashes.
The first step, pairing with the hub
First start adding light from the interface, then connect the controller according to its type, the Quick start mode works for all wall-mounted battery-powered controllers. The button battery is ready in the controllers. Remember to remove the protective plastic of the battery before making the pair connections!
Pairing to hub with different controller types
- Press the lowest I and O buttons on the controller or S1, S2 buttons (the two lowest on the RGB+CCT controller) simultaneously three times, pairing with the Hub is activated. The pairing ends with five rapid indicator light flashes, NOTE! The app claims that nothing was found, but the button is connected according to the indicator light. everything will be OK. A single button is inserted into the hub once even if it controls several groups of luminaires.
This method is used to attach the buttons below
Wireless LED dimmer – VaLO Zigbee, 1-piece button white and black, SKU VaLO-P1OS-ZG
Wireless LED dimmer – VaLO Zigbee, 2-piece button white and black, SKU VaLO-P2OS-ZG
Wireless LED dimmer – VaLO Zigbee, 4-piece button white and black, SKU VaLO-P4OS-ZG
Wireless LED dimmer – VaLO Zigbee, CCT control button white and black, SKU VaLO-P1CCT-ZG
Wireless LED dimmer – VaLO Zigbee, RGBW control button white and black, SKU VaLO-P1RGB-ZG
Wireless LED dimmer – VaLO Zigbee, RGB+CCT control button white and black, SKU VALO-P1RGBCCT-ZG
Once the pairing with the hub is complete, we continue by pairing (Touchlink) the controller control group and the driver of the lighting group that we want to control from both the hub and the wireless controller.
The second stage, pairing the controller with the transformer
PAIRING IS DONE LIKE THIS:
The connection method is Touch Link, which is done by bringing the controller less than 10 cm from the transformer. Linking between devices is done by first opening the Touch Link pairing mode on the transformer, four (4) presses per program key. After this
- for a one-part controller, hold down both buttons until the controller indicator light starts flashing, followed immediately by two presses of the I button.
- in a two-part controller, the bottom right + left buttons indicate which group you want to assign the lights to. Hold down simultaneously for three seconds and release.
- on the square controller, use the bottom right + left buttons to select the group to which you want to assign the lights. Hold down simultaneously for three seconds and release.
- On the CCT control button, hold down the two lowest buttons (S1 and S2 buttons) simultaneously for three seconds and release.
- For the RGBW control button, hold down the two bottom buttons (S1 and S2 buttons) simultaneously for three seconds and release.
The pairing starts with the flashing of the LED indicator light on the controller and ends with the flashes of the paired light group. Pairing takes approx. 10 sec.
5. Wireless, battery-powered, remote-controlled controllers
You can use wireless remote controls either with a mobile control (mode b) or connected directly to groups of luminaires (mode c). The remote controls have white light tone control (CCT) and dimming, RGB colour control and dimming or both CCT+RGB and dimming. Add 3XAAA finger batteries to the device. The CCT+RGB remote control works with two AAA finger batteries. These are not included in the product.
PAIRING IS DONE LIKE THIS:
CCT and RGB and RGB+CCT remotes are connected to the hub in the same way by starting the search from the interface. Then press the on/off button until the indicator light is activated. Then press the S1 button once, and the pairing process starts. The indicator light flashes 5 times to indicate a successful connection.
That is, the RGB and CCT remotes are connected to the transformer via Touch Link by activating the Touch Link pairing mode from the transformer with four prog key presses. The remote control is then brought to a distance of less than 10 cm from the transformer and press the on/off button once. Then the number of the group you want to be associated with. Then press the on/off button once and the S2 button once. The pairing mode is activated and ends with six indicator light flashes and two lights flashes.
Below is an example of the CCT remote control Touchlink pairing process.
6. Wireless, network-powered controllers
These devices are used for the use of
b
or
c
i.e. either connected to a hub or connected in pairs to transformers only.
Available at
b
mains-powered controllers, such as the VaLO Wireless Zigbee CCT LED Wall Controller for 4 groups, 230V (SKU Valo-INWALL-ZG-4OS-CCT), are wirelessly connected to the mobile controller, i.e. the hub, by pressing a button in the middle until the indicator light is activated. Then press the bottom left button (S1). At the end of the process, the indicator light flashes 5 times to indicate a successful pairing.
Below is an example of the English version of the manual.
For mains-powered devices, after connecting to the hub, a Find & Bind mode pairing is performed between transformers and controller groups 1-4. So follow the Find&Bind instructions for both the transformers and the controller, which are:
- on transformers press three (3) times program bump
- Then use the buttons on the top row to press the number of the group you want to associate with the control. Press the centre of the controller until the indicator light is activated, then press the S3 button.
If used with a drive mode
c
then only
Find&Bind
pairing.
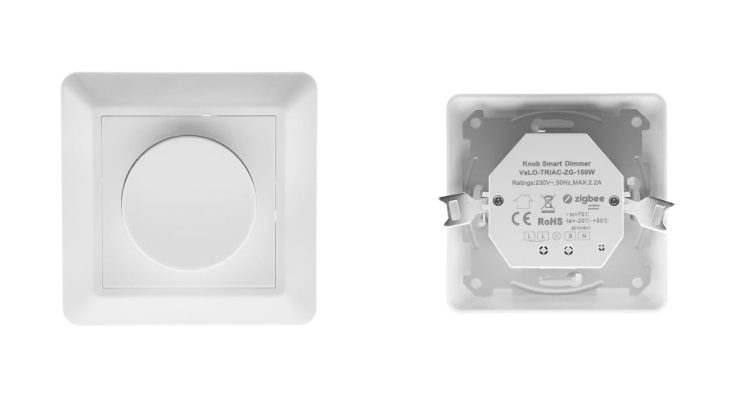
In our second plug-in model. LED TRIAC dimmer and Zigbee receiver 230V – VaLO, for led lamps, max. 150W (EXXACT), (SKUValo-TRIAC-ZG-150W) pairing with the hub is established by starting the light search/addition from the hub and then switching on the power to the dimmer. The hub finds the dimmer in the paired mode and the lights connected to it flash five times and then stay on solid. The transformer here is the driver transformer to which the switch is wired, so there is already a connection between them.
If you want to add more controllers, follow the Touchlink pairing process and connect the controllers together.
7. How to pair: video tutorials on LedStore’s You Tube
We have put together a video tutorial on You Tube: an example of pairing a two-piece pushbutton with a transformer. https://www.youtube.com/watch?v=IlN87nN0eZE&t=4s
The transformer can also be paired with multiple buttons in addition to the mobile control. In this case, the same procedure is followed, but the connection of the controllers is repeated several times. Here is a You Tube video on the subject: https://www.youtube.com/watch?v=aunrKLsKqYY
8. In case of errors
All devices also have reset instructions in case the connection fails. In this case, you should reset. The instructions for the devices all start with removing the device to be connected from all networks, i.e. resetting to factory defaults. Only rarely does a reset need to be done before starting the splice. From the hub/interface, the device can be reset by simply unplugging the device. In addition, it is a good idea to reset the device manually. It is also good to know that the pairing process is timeout after 180 seconds. If a connection fails, you should wait 180 seconds before trying again.
We have also written about Zigbee in previous parts 1-4, which can be found below:
Part 1 for more details on the use of c https://ledstore.fi/blog/2021/10/01/zigbee-valaistuksenohjaus-haltuun-osa-1/
Part 2 for more details on uses a and b https://ledstore.fi/blog/2021/10/06/zigbee-valaistuksenohjaus-haltuun-osa-2/
Part 3 LedStore bulbs and other Zigbee devices in different interfaces https://ledstore.fi/blog/2022/02/14/zigbee-valaistuksenohjaus-haltuun-osa-3/
Part 4 Wiring and Zigbee operation of colour temperature controlled lights from an installer’s perspective https://ledstore.fi/blog/2022/08/04/cct-zigbee-alyvalaistus-asentajan-nakokulmasta/
All ZigBee devices are available at LedStore’s store in Koivuhaa, Vantaa, at Mesikukantie 16, 01300 Vantaa. We have installed Zigbee controls in the store, and we use Philips Hue and Samsung Smart Things apps.