
Making indirect light on the ceiling? Is it difficult and expensive? Housing acquired and dull concrete roofs. Most of the roofs in apartment buildings have cavity tile roofs with a “popcorn” roof. A couple of hanging lamp places and that’s it. Boring. How can you make it more comfortable for a reasonable amount of money and effort? In this case, the renovation was carried out in a small apartment, where smart lighting is also desirable, as it is a young person’s apartment who is already familiar with Philips HUE. So colour and light! Let’s get planning and doing. Read here how indirect lighting on the ceiling affected the look of the apartment, and how the renovation was carried out.
Making indirect light on the ceiling or on the wall? We did both!
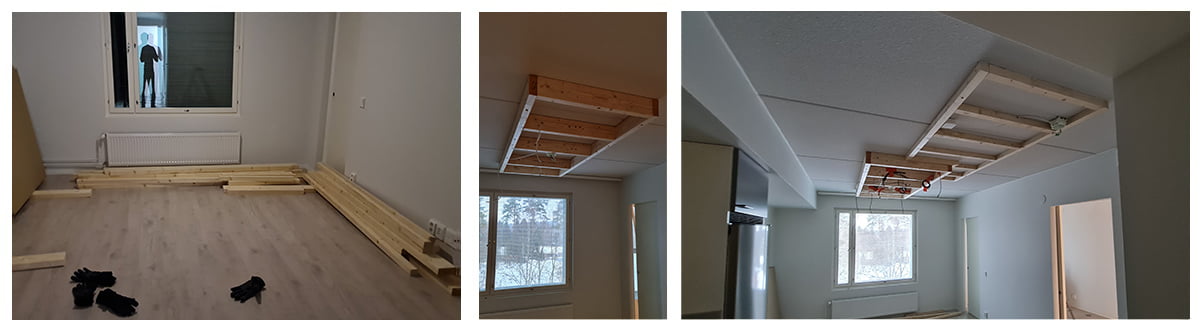
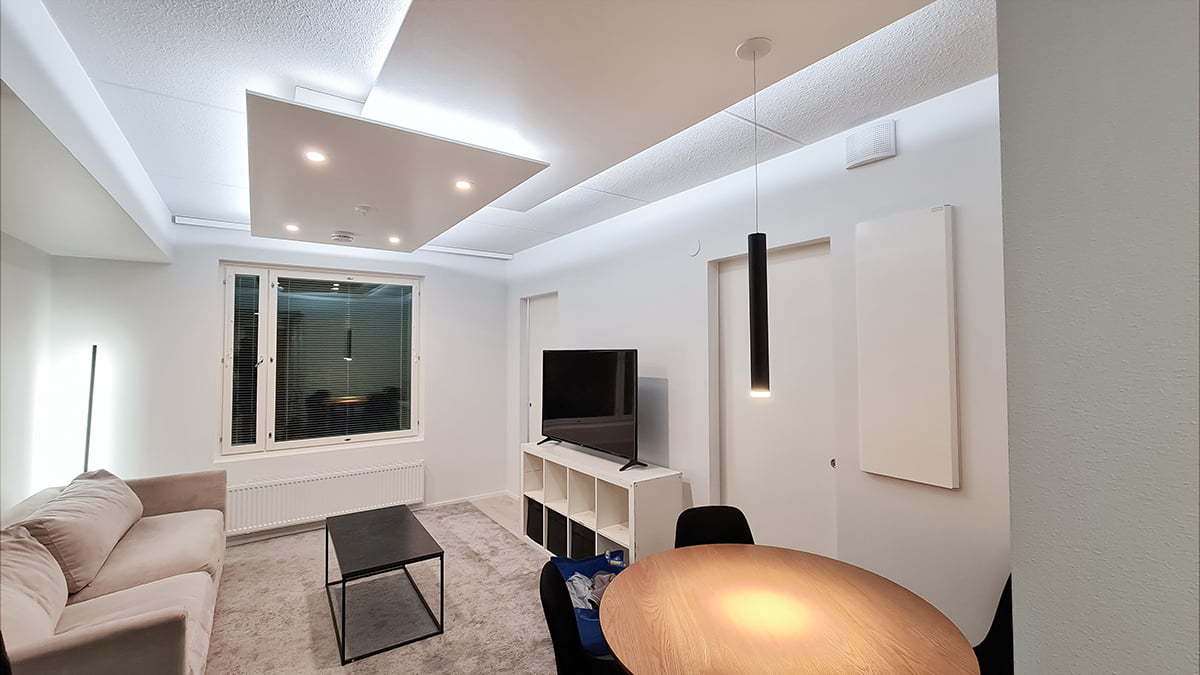
The apartment had only a few pendant light points in the ceiling at the start and it was decided to use them as power supply points. In the living room, a partial and overlapping drop was built into the ceiling with plasterboard, which was lit from the edges, and in the bedroom, the entire 12m2 ceiling was lowered except for the edges, allowing indirect light through the walls. An RGB+CCT Led strip with colour temperature adjustable CCT and colour adjustable RGB light was used as the stripstrip. The advantage of a colour temperature adjustable white striplight is that the room always has the right light temperature (2500-5500K). Adjusting the colour temperature affects the mood of a room, with a free choice of light shade between warm white and cool white. The colours were again chosen for strip, because it makes it easy to add a festive atmosphere to the apartment! The cut-to-size LED stripwere glued to low aluminium profiles, which were placed around the edges of the downlight in the living room, and at the edge of the ceiling, on the side of the downlight in the bedroom.
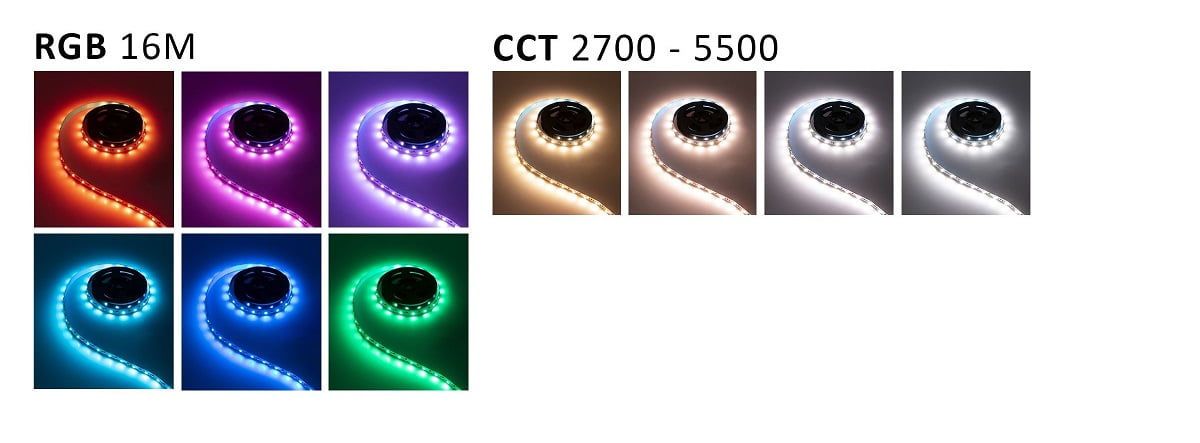
The installed LED strip differs significantly from traditional market strips. The LED strip used is the perfect solution for indirect lighting. It can also be measured very accurately thanks to the shorter than usual cutting spacing. The luminous efficiency is really good, the coloured lights are bright and the white light really illuminates, even though it comes indirectly. The light is also very high quality, with a white light colour rendering index, CRI, of a staggering 98! One metre of RGB+CCT10+10 W/m LED stripprovides 800 lumens, so all in all there is a nice amount of light output from the ceiling. RGB+CCT stripusually work with either colour OR white light, so the power input is 10W/meter. There is also a SOLO version for even more demanding applications, where the LED dots are directly visible, and the dots can be a bit distracting, although the profile cover does smooth it out.
When the lights are on during the dark times of the year, a high-quality white light provides a contrast to the darkness. If you want to calm down you can dim everything. In the corner, still next to the sofa, there is a versatile indirect light as a floor lamp – Floor Line 1600. Pendant lamp on the dining table PIIPPU. In addition, one light panel was added in the hallway. More photos of the site at the end.
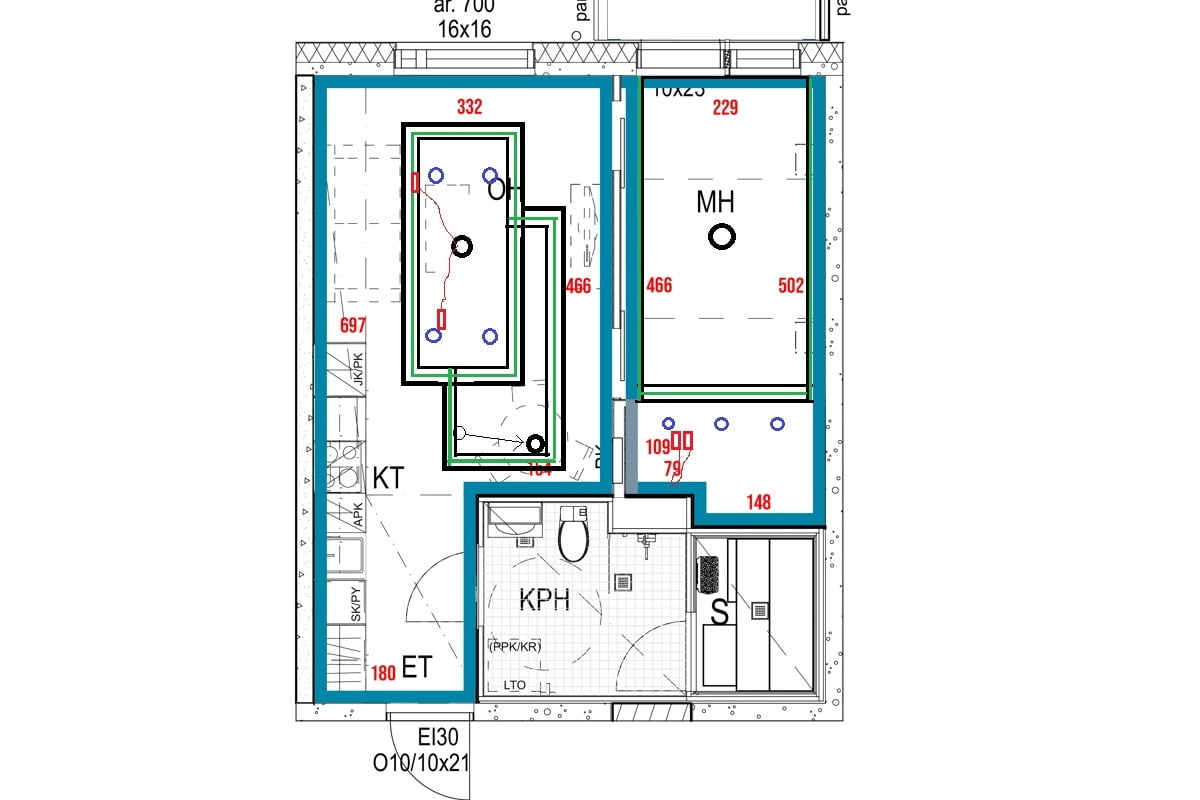
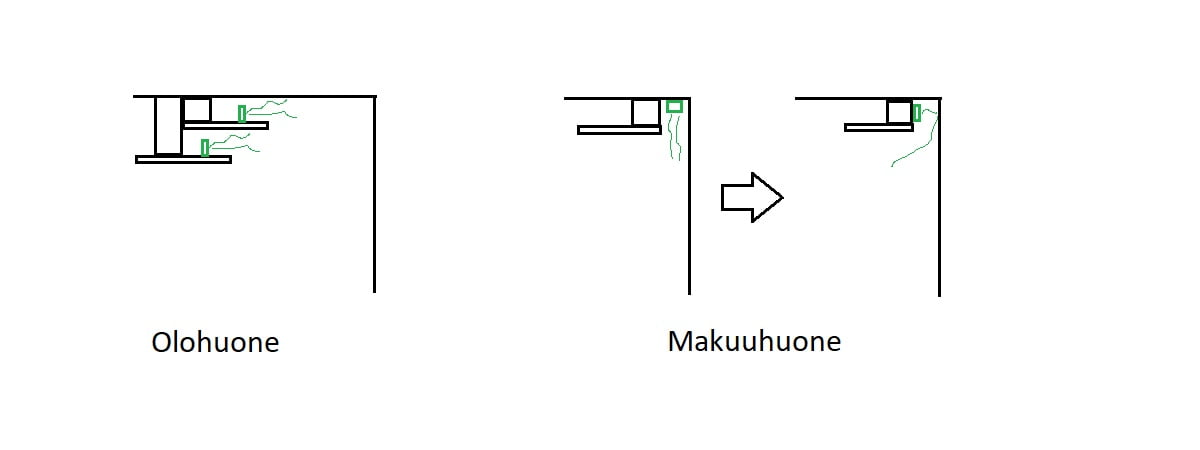
This is what the floor plan looks like. Green lines indicate stripstrip lighting and blue circles are spot lights. Roof boxes are marked with black circles.
LedPajka or home made led strip indirect light for ceiling
Once the floor plans had been seen and the lighting plan had been drawn up, the rework was summarised as follows:
- Led stripand spot selection.
- Buying and carrying timber, paint, plaster and gypsum
- Making a coulomb on the roof
- Recovery of old electricity and installation of wiring
- Put the plasterboards in place and hide the screw heads
- Installing lights and transformers on top of the sash for working light
- Pairing with Philips HUE
- More pakkel, more priming and more pakkel
- More sanding and paint
- Wireless control pairing with a controller (Friends of HUE)
- and playing with lights =)
This job, which took a seasoned (light) renovator 30 hours to complete, made all the difference to the look and versatility of the apartment. I will go through and post pictures of the renovation work.
Making indirect light starts with design. So the first step was to design the size of the roof. The choice was made easier by the limited time available and the desire to make the edges easier to work with. So the drop to the ceiling was made using a standard plasterboard size of 1200x2600mm. An alternative would have been a veneered furniture board from a carpenter, with hidden fasteners, but we wanted white.
The big advantage of furniture board would be a one-time surface finish and super-fast completion rather than the mess of sanding and painting. The soffits were made so that they were always off the wall, so there was no need to paint or guard existing walls.
Living room
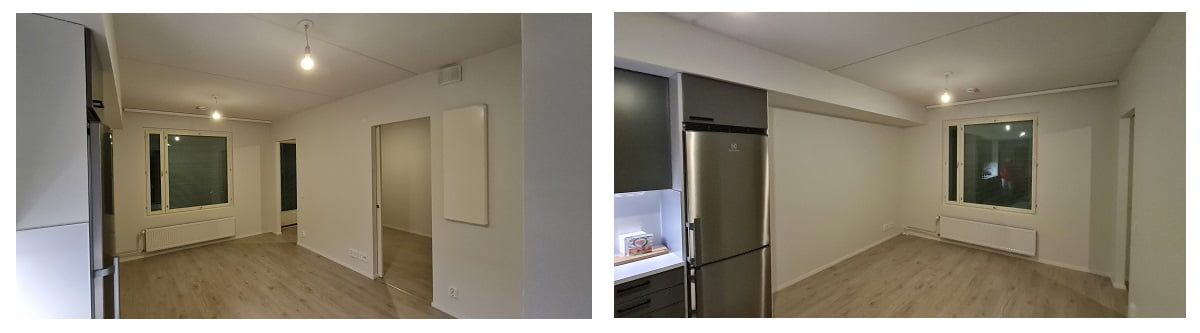
EDIT: The indirect light was started by carrying the stuff to the seventh floor.. =)
The indirect lighting of the ceiling started with a 2 level ceiling with a colonnade. First I installed a larger drop with 48x123mm gauge for a perimeter 15cm smaller than the drywall, i.e. 900×2300. This way the shelf is 150mm and can hold the transformers, and the light, without being visible over the edge of the sash. Then I made another column of 48×48 wood that collided with the other column. This structure gives a little character to the roof. There would be plenty of options in terms of size and shape.
To fix the coax to the concrete roof I used 8mm screws and 5/90mm and 6/140mm screws. In ceiling installations, the plasterboard should be laid every 40cm, although in practice I have found that 50-60cm goes with EK board without the board starting to sag.
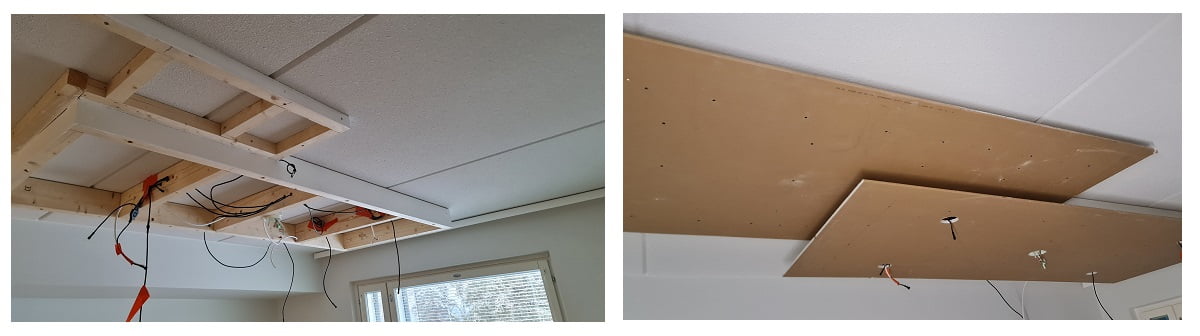
Next, I replaced the ceiling box and pulled more wires from the box to the led stripand spot transformers through the wire loom, and moved the location of the pendant light on the dining table out of the hallway(!). At this stage, I painted the colonnade trees once, although they are not very visible from there.
Plate on the ceiling. First attach the L-shaped upper plate to the ceiling and screw it on. It only had a 95mm hole in the jewellery box. Next, I drilled a whole plate in the lower level and drilled 4 78mm holes for the spots and the box. And put the plate on the ceiling.
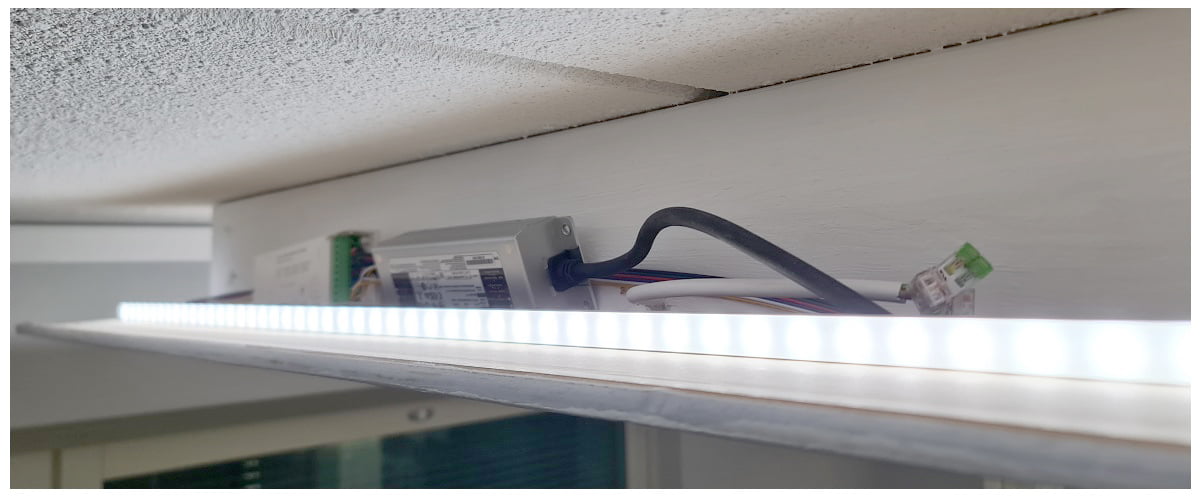
At this stage, I was already able to connect the transformer to the transformer box and put the LED profiles from LedPaja on the shelves. The transformer is hidden on the shelf, but still easily accessible. The stripstrips with their profiles are on the front of the transformer on the shelf. Philips HUE plugged in and mobile phone in your pocket… voila! Pairing and lights work great. I had to play with the colours but chose a neutral white light for the work light.
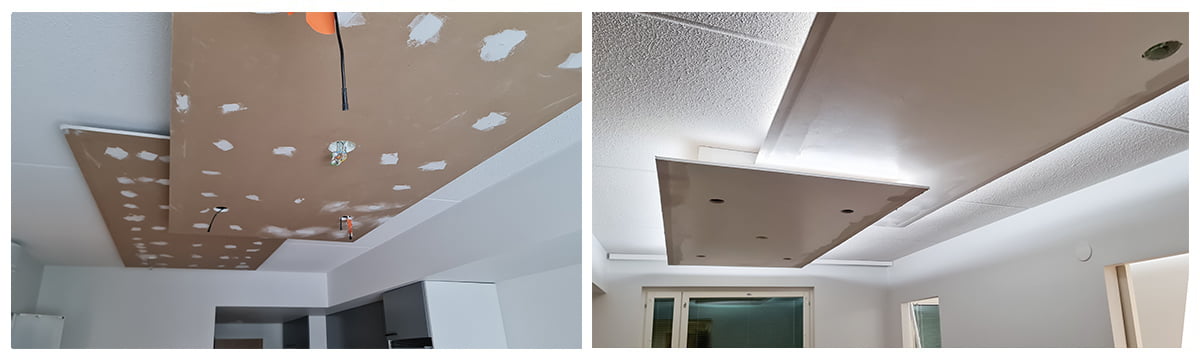
Apply primer and wait for it to dry… Next primer and more primer. At this point, in hindsight, I could say that less packing would be done if the drywall had slanted edges up or if a straight-edged board was used. After the packing, just topcoat 2 coats and put the led spots in place.
The transformer for the spots could have been placed on the same shelf as the transformer for the LED strip, but since there are only 4 spots and the assembly is 123mm high, the transformer could be folded out of the spot opening just fine. The spots themselves were simply pressed into the ready-made connectors. And again Philips HUE pairing. OH done.
Bedroom
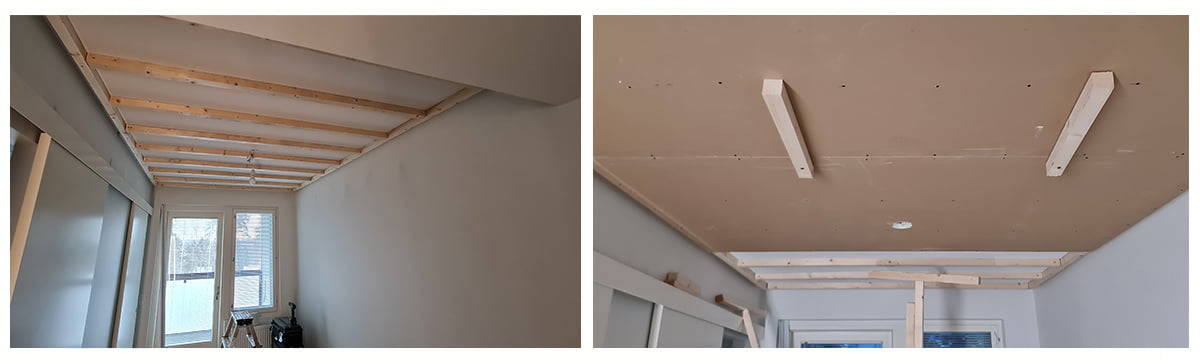
The indirect lighting on the ceiling in the bedroom overlapped with the living room. The original idea was to do a similar drop ceiling, but after knocking down a wall in the cloakroom, the ceiling had to be re-laid, and a light trap was added by leaving the ceiling plate 15cm long. So I ended up framing the whole roof, but so that the framing and the new roof are 48x48mm away from the walls on the long sides.
The order of march was the same. 48x48mm ceiling reinforcement every 40cm by propping. A jewellery box on the ceiling to replace the old one. For the bedroom we also considered spotlights, but since there is a lot of indirect light on the ceiling and the ceiling of the old wardrobe at the other end of the room had spotlights, we didn’t want more spotlights on a large surface.
Plasterboard for the ceiling and packing for the seams and screw heads. Paint the surface.
The aluminium profile of the stripstrip was initially going to be fixed directly to the ceiling at the bottom of the recess, but I decided to fix them to the side of the ceiling. This required planning, as the profile brackets had to be screwed down before the framing was fixed to the ceiling. Screwing them in afterwards would not have been possible without a special tool. Or they should have been glued with good quality 2-sided tape or glue.
Controlled in the bedroom 100W transformer + receiver RGB+CCT.
I placed the transformers for the Led strips in the same place inside the ceiling of the old wardrobe in the service hatch. Philips HUE from the phone open and pairing for ribbons and spots. All the electricity is supplied by the old ceiling lamp, so only the lights are “always on” from the wall switch and the control is done with wireless buttons.
Of course, the old switch also works fine in the bedroom and living room, because LedStore’s Zigbee devices have an internal memory and the lights always return to the same setting they were in. Everything worked great!
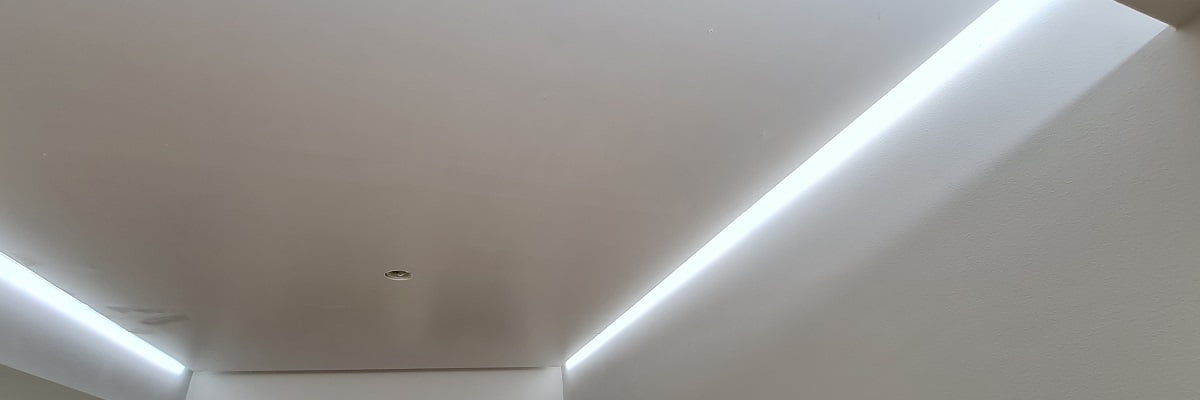
The atmosphere from the lowered roof
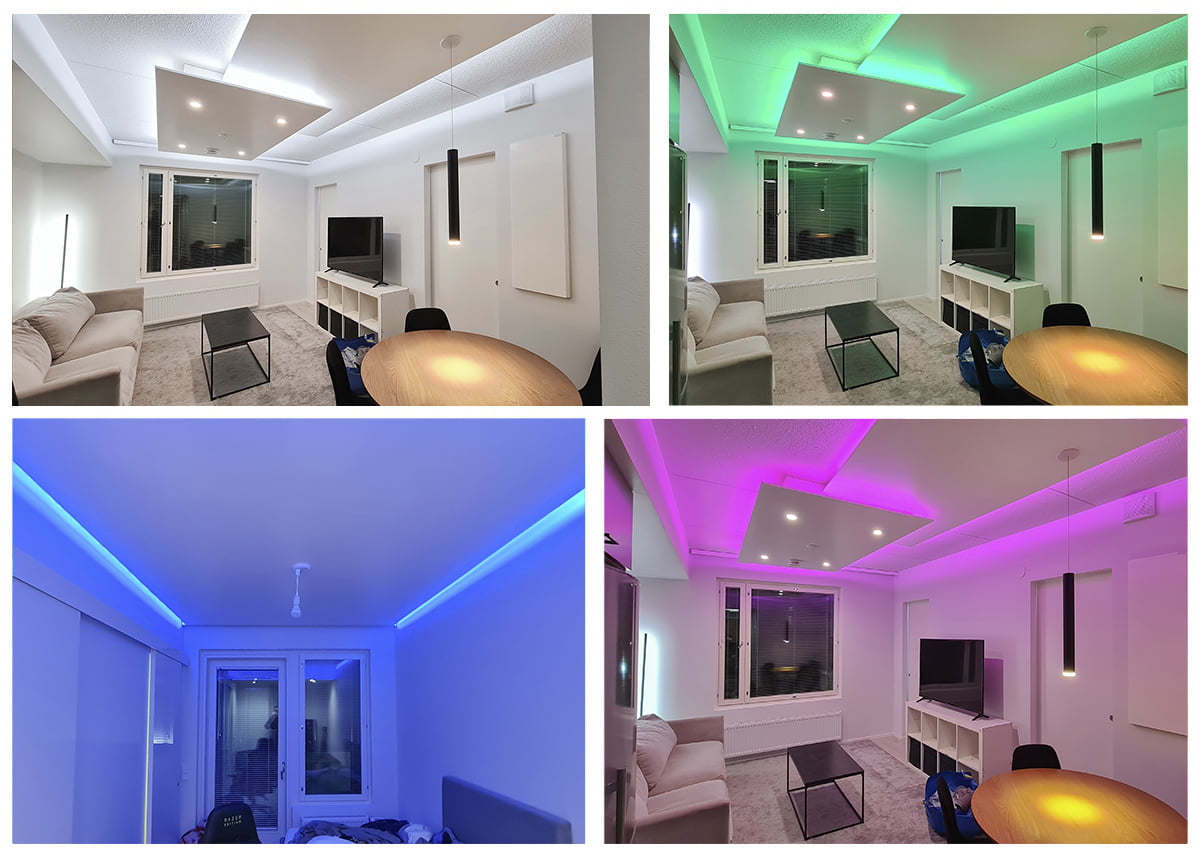
I easily adjusted the colour temperature and colours of the light to the desired Kelvin level with a wireless controller.
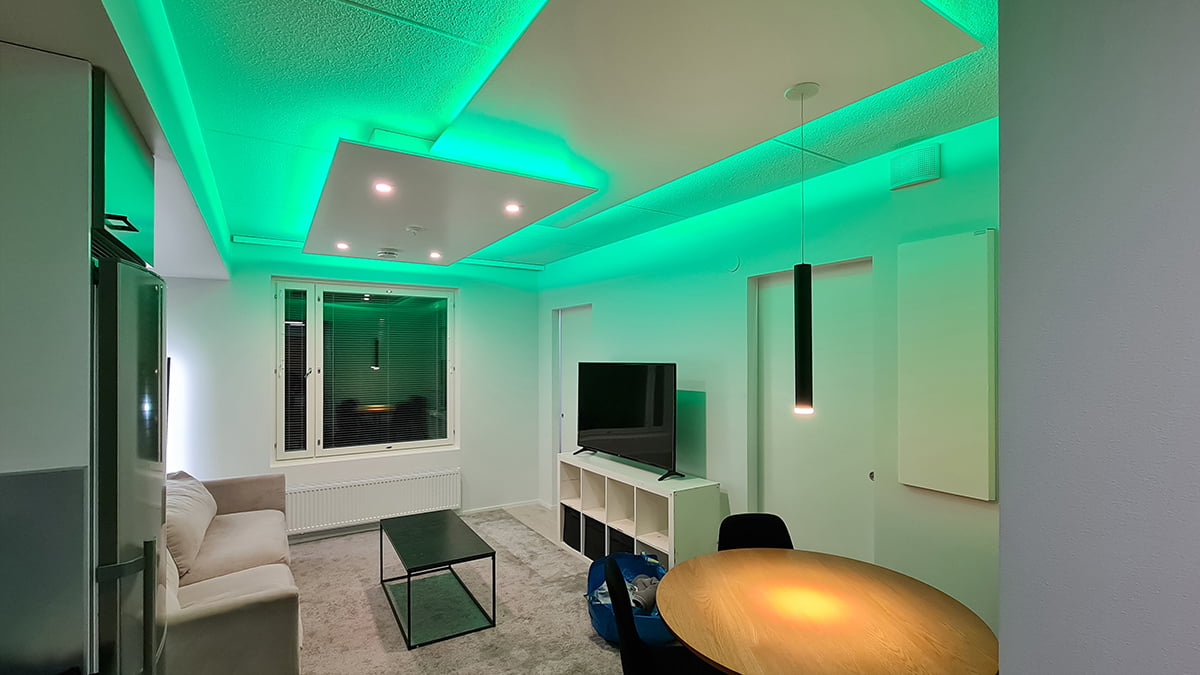
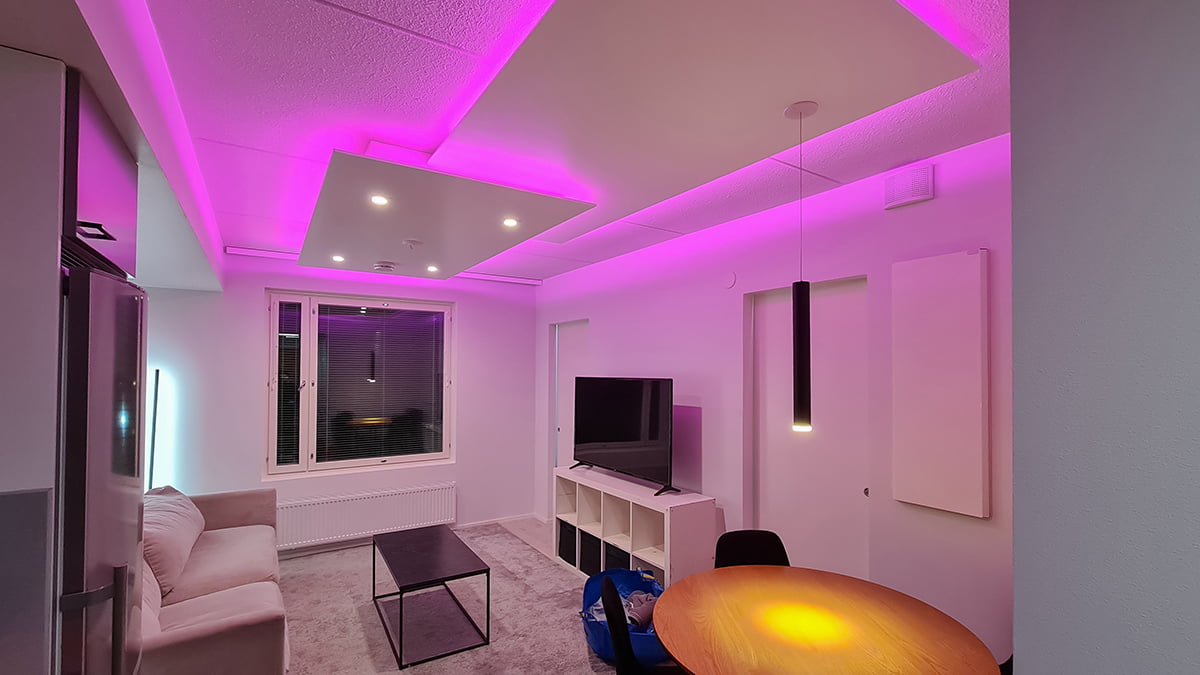
When you want to feel fresh to help you cope with the chaos, the light is cooler (+4000K) and in the evening it’s warm (-3000K) to calm you down. But when it’s a housewarming party or Christmas, the colours come in!
The controller is a Zigbee Friends of HUE controller, which was paired with the Philips HUE bridge. Mostly the lights are timed (warm in the evening, cool during the day), but if necessary you can turn on/off the lights on the wall and activate a lighting mode. The Friends of HUE button differs from other Zigbee buttons in that its button functions must be programmed in the HUE app. So you can decide for yourself what each corner of the button does.
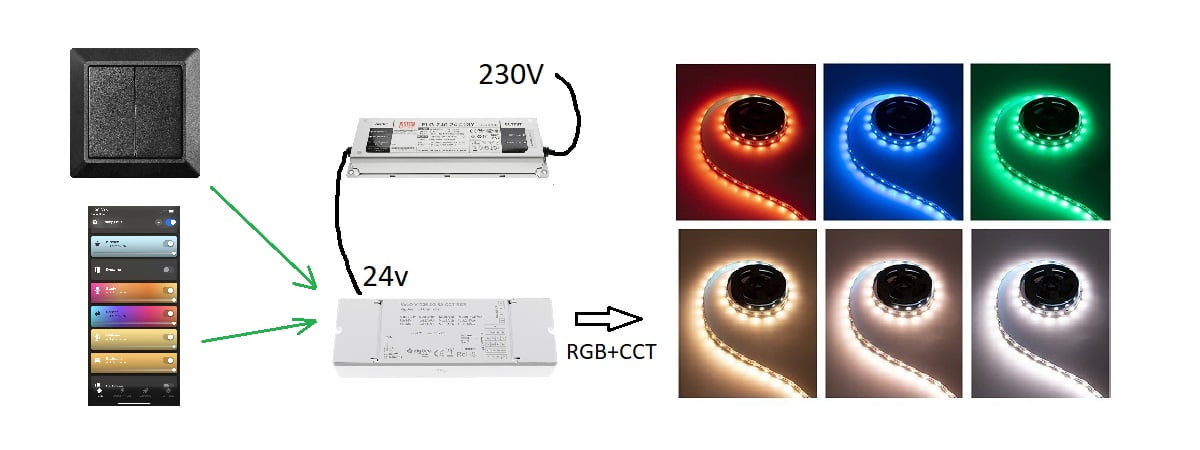
The Zigbee receiver is the one that is paired directly with the HUE and which tells the LED stripwhat colours come out and at what brightness. In the living room, the receiver was installed on the 150W 24V IP 65 transformer before the LED strip and the package is on the edge of the lowered ceiling. So 230V transformer -> Zigbee receiver -> led strip.
Led stripfor drop ceiling
Indirect light cannot be made without stripLED strip. I used RGB+CCT led strip, which can be cut at 12,5cm intervals(SOLO RGB+CCT striphas a 4,2cm cutting interval). The circuit of the larger shelf against the wood is 90+230+90+230cm = 6,4m, but I wanted strip5cm away from the wood to fit a transformer in between. So I ordered stripLED stripin 6,6m length. With the placement of the Led strip, I decided that it should be on its side on the shelf, pointing straight out, not against the ceiling. Thus, the whole 6,6m of led stripgoes around corners without being cut. Only the aluminium profiles had to be cut to straight dimensions.
So I threw the aluminium on the shelf and then glued stripto the profiles and the covers on top. The lids have protective plastic that I left in place in case the paint would spill for some reason… and it did spill at the end =)
The RGB+CCT striphas six (6) wires that had to be connected to the receiver. Fortunately it has quick connectors so no tools were needed and clear markings (R = Red, G = Green ,B = Blue, WW = Warm White , CV = Cool White and +).
Pairing was an easy process. In the Philips HUE app, just “Add a lamp”. The receiver is located under the end cap with a black button. Press it five (5) times in rapid succession and it will go into pairing mode. Of course a note; if the device is new it should automatically go into pairing mode when it gets power.
Amount of light in the indirect ceiling
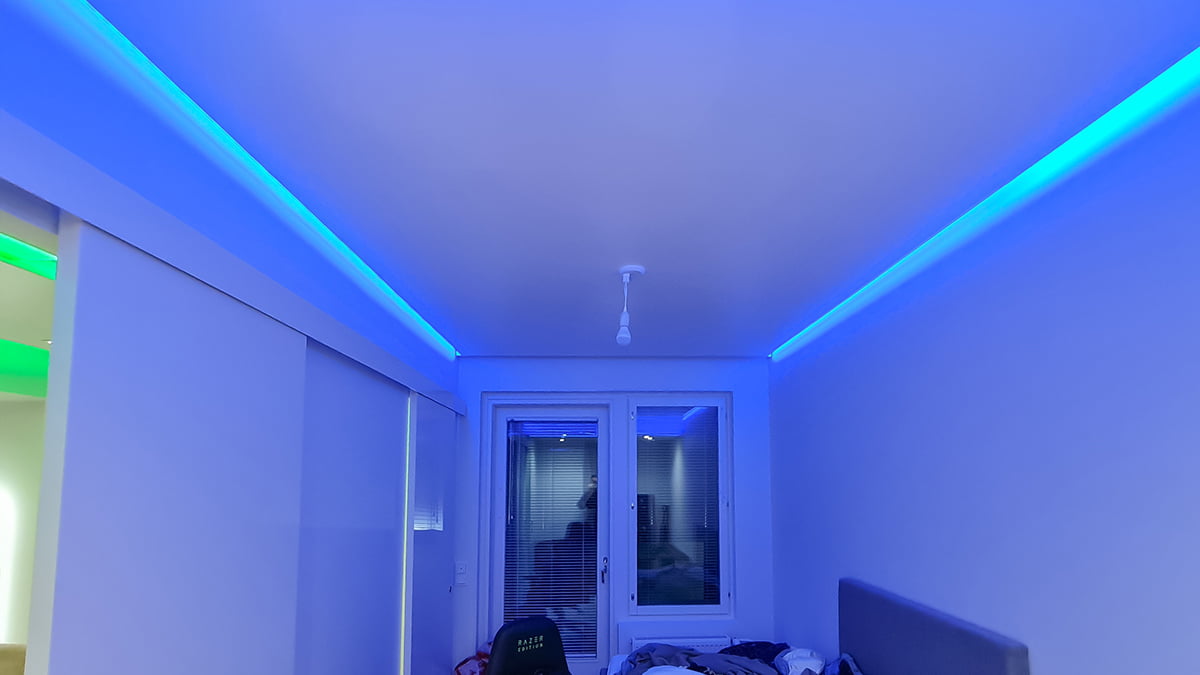
The positioning of the Led stripaffects the opening of the light in the indirect structure. In this case, in the living room it is maximised and the light comes directly outwards along the white ceiling, but in the bedroom it comes against the wall. When indirect lighting was first started in the bedroom, it was also supposed to come directly down the wall, but during the construction phase another solution was chosen. When light comes through a wall rather than along a wall, it is strongly influenced by the colour and material of the wall used. If the walls were dark, the end result would look different and the light temperature control would be all the more valuable. Warm light, for example, is completely different against a white wall or colourful wallpaper.
The space gets a nice amount of light from indirect light alone, as the surfaces are white. Indirect light alone is no way to work, so there are direct spotlights at the workstation and on the coffee table in the living room to support the lighting. So the moment when a young person cleans up (rarely..) there are full lights on. In total, the led stripwent 6,6m + 5,2m to the living room = 11,8m and to the bedroom 3,5m + 3,5m + 2,6m = 9,6m. Since the RGB+CCT 20W strip only uses either CCT 10W or RGB 10W components at a time, the maximum power consumption is 10W x metres, or 120W and 100W respectively.
What does it cost to make indirect light? Price of a lowered roof
What does it cost to make a drop ceiling? Time and money. The wood materials for both rooms cost about 150€ with screws and screws and screws. If the drop ceilings were made from furniture board by a carpenter, the roof boards would be considerably more expensive, but the time and paint and mess would be saved. Veneered 120x260cm wooden boards from a carpenter with edging are 300-800€/piece depending on the material. Plasterboard 17€/each… Plus packing 20€ + paint 50€ + rollers and tapes 20€, which was easily enough for many boards. The price difference is..
BUT if you get a repairman to do it, it takes 3 days, because sometimes you have to wait for it to dry and do another round, and that also takes hours and costs money. The price of a lowered roof therefore depends on the materials and hours. It doesn’t cost anything to do it yourself, does it?
That is, materials for lowered ceilings 400,00€
The lights were in the main part, so no expense was spared. 22m RGB+CCT led stripready made to measure in profiles 1600,00€. Transformers, buttons and receivers for them 565,00€. 3 heat adjustable SQ023W spotlights went under the old wardrobe and 4 in the living room. With transformer 641,00€
So the price of the lights with the lowered ceiling and controls is 2165,00€ + spotlights 641,00€
They also wanted a floor lamp in the corner to provide a reading light for the sofa and a good light for the flowers that will come to the window later, and the Floor Line 1600 was chosen because it is a directly temperature-controlled Zigbee lamp.
If you have the know-how, the cost of making the roof itself is low. For the lights on the lowered roof, if you use a basic 14,4W LED stripwith temperature control and 22m profile, ready to measure 1100€ and for those transformers + controllers 576,00€, that is 1770,00€ which is 400€ cheaper. And if you can cut and make the intermediate wires yourself, the price drops another 200€.
Lowered ceiling and indirect light ready
What does it look like then? Here are a few pictures of the finished object:
And one last glimpse into the bedroom, into the blue moment:
Anything else?
Read more about how we did the same for an office room: renovation of a lowered plaster ceiling.
Indirect light in the ceiling as retrofit with profile only: Indirect light in the ceiling as retrofit.
Office acoustic improvement and indirect light: acoustic spraying on a lowered ceiling
Upgrading your terrace lighting with indirect light: the NEON led stripfor your terrace
Read more about our LedPaja service if you are interested in custom-made LED striplighting!